|
Laser Alignment Station |
||
|
High Precision Optical Assembly Starts Here! space
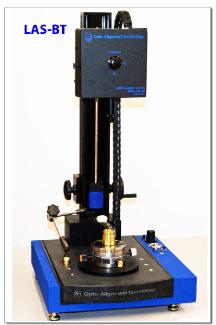
The Laser Alignment Station is capable to perform precision lens centration and tilt measurements on the following samples without changing objectives: Radius ranging from 2.0 mm to infinity (plano), Lens diameters from 1 mm to 800 mm+, including cylinder, aspheric and parabolic surfaces. LAS units come in three basic designs and the finished instruments are usually custom built on one of these base models to meet the customers specific application. The user friendly software CalcuLens Assembly is standard to all LAS models with some variations. The LAS with CalcuLens Inspection is a very powerful metrology tool for quality assurance of completed, assembled lenses. space Compact, Bench-top Precision LAS-BT Bench-top base model includes: 633 nm laser-reflection based Optical Module. 380mm Vertical linear focusing movement with multi-speed stepper motor and encoder. 100 mm Ø motorized air-bearing (ABS), vacuum through center. Calculens Assembly software for measuring alignment errors of top two surfaces. Measuring resolution 1-3 micron TIR, depending on the lens specs and optomechanical design. Mechanical indicator. Integrated vacuum wand with vacuum cup for lens handling. Net weight 98lb. Options: Vertical focusing travel 508 mm. Calculens 3D software for center of curvature plotting and measuring separate tilt and decenter errors of top two surfaces. Rotary encoder for ABS. Custom brass chucks. Self centering three-jaw chuck. Electronic indicator with Ultra light Probe. space Midsize, Ultra Precision LAS-UP Free standing base model includes: 633 nm laser-reflection based Optical Module. 800 mm vertical linear focusing movement with multi-speed servo motor. 100 mm Ø motorized air-bearing, vacuum through center. Calculens Assembly software, measuring resolution 0.2 micron TIR depending on lens specs and optomechanical design. Load capacity 113 kg. Options: MWIR or LWIR Optical Module. Vertical focusing travel 1000 mm. ABS diameter 150-300 Rotary encoder. Calculens 3D software. Calculens Inspection software for measuring in-stack (embedded) lens alignment values, TIR. Electronic indicator with ultra-light probe. Custom brass chucks. Self centering three-jaw chuck. Center thickness and airspace measurement. space Large, Ultra Precision, for Lithography Optics Alignment LAS-LS Custom designed for large lens-systems assembly like microlithography stepper lenses. Optical module wavelength options from Visible to LWIR. Up to 2000 mm vertical linear focusing travel. 400-800 mm Ø motorized or manual air-bearing, vacuum through center. Rotary encoder. Calculens 3D and Calculens Inspection software for measuring in-stack (embedded) lens alignment values, TIR. Measuring resolution 0.1 micron centration, depending on the lens specs and optomechanical design. Center thickness and airspace measurement. |
||
|
Sales@DataOptics.com 800-321-9026 734-483-8228 734-483-9879 (fax) |
||


